Thursday, November 3, 2016

Truncating DATAEXPORT target relational table with CDF

First of all, I am a big fan of Essbase DATAEXPORT calc script to relational database. It provides flexible way of communication between cubes. You can export data to a relational table then manipulate through SQL load rule and load it back.  Certain type of mapping / data management is much easier in SQL. Moreover entire script can be called from Maxl. 
    Well, can it be? One problem though, Essbase DATAEXPORT calc does not allow you to truncate / delete from the underline table. Bummer!! How hard it could be for oracle to provide that function? It would have save my time of writing this blog and yours reading it. 
We will solve this issue with CDF (custom defined function). If you have not created your first CDF yet, then this is a good place to start. Once you have that CDF ready you can use it in your calc script like this…

Steps to install CDF

  1. Install JDK. In my case I have JDK 1.7 
  2. Install Eclipse (Java IDE). 
  3. In Eclipse create a new Java project. (File->New->Java Project). I have named it CDF.
  4. Expand the project and right click on src folder, create new -> package. I named it  com.williams.cdf
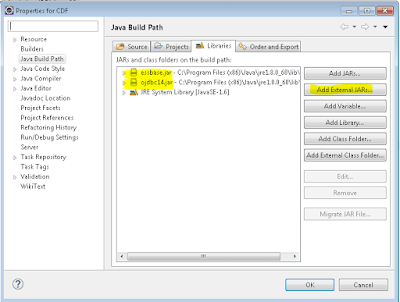
  5. Right click on com.williams.cdf and select Build path -> Configure Build Path. Click on the Libraries tab then add 2 External JARs essbase.jar and odbc14.jar. File essbase.jar is available in Oracle/Middleware/EPMSystem11R1/products/Essbase/EssbaseServer/java directory. you can download odbc14.jar from internet. It is required to connect to your underline oracle database. If your relational database is not oracle then you need corresponding java jar file to connect with that database.
Now the set up is done,  it is time for coding.
 6. Right click on package com.williams.cdf and create new -> Class.  I named it relationalDDL. Once done, it should look like this...
Here is the code that I have for relationalDDL.java ...

package com.williams.cdf;
  
import java.sql.*;
import oracle.jdbc.pool.OracleDataSource;

public class relationalDDL {
    static Connection sqlcon=null;
    static Statement sqlstmt = null;
    static OracleDataSource ods = null;
  public static void main(com.hyperion.essbase.calculator.Context ctx,String args[]) {         
         truncateTable(args[0],args[1],args[2],args[3]); 
    }

   private static void openConnection( String URL, String userid, String passwd) {
                    try {
                                                ods = new OracleDataSource();
                                } catch (SQLException e1) {
                                                System.out.println("New Connection Object creation Failed: " + e1.getMessage());
                                }
                ods.setURL(URL);
                ods.setUser(userid);
                ods.setPassword(passwd);
                                try {
                                                sqlcon = ods.getConnection();
                                                System.out.println("Oracle database connection established to "+ URL);
                                } catch (SQLException e) {
                                                System.out.println("Connection Failed to "+ URL);
                                                System.out.println("SQLException: " + e.getMessage());
                                }              
           
    }
    private static void closeConnection(Connection oraConn){
                if(oraConn != null)
                                {
                                                try
                                                {
                                                                oraConn.close();
                                                }
                                                catch (SQLException x)
                                                {
                                                                System.out.println("SQLException: " + x.getMessage());
                                                }
                                }
    }
    public static void truncateTable(String table, String URL, String userid, String passwd) {
     
                System.out.println("CDF Started");
                openConnection( URL,userid, passwd);
                try {
                                                sqlstmt=sqlcon.createStatement();
                                                sqlstmt.execute("TRUNCATE TABLE "+ table);
                                                System.out.println("Trancated table: "+table);
                                } catch (SQLException e) {
                                                System.out.println("SQLException: " + e.getMessage());
                                }
                closeConnection(sqlcon);
    }
}

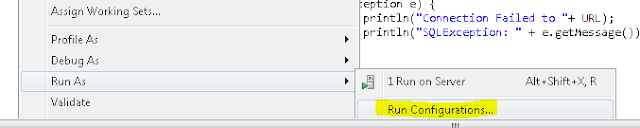
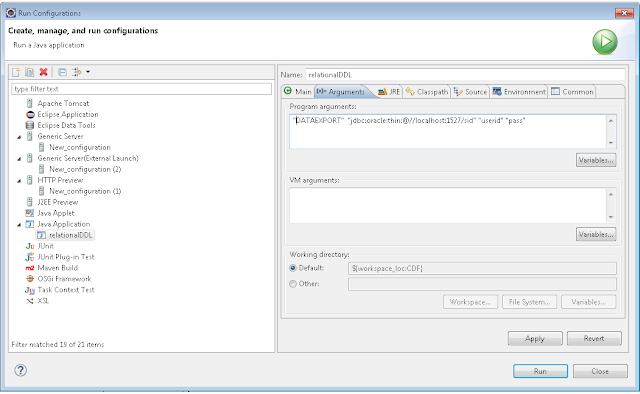
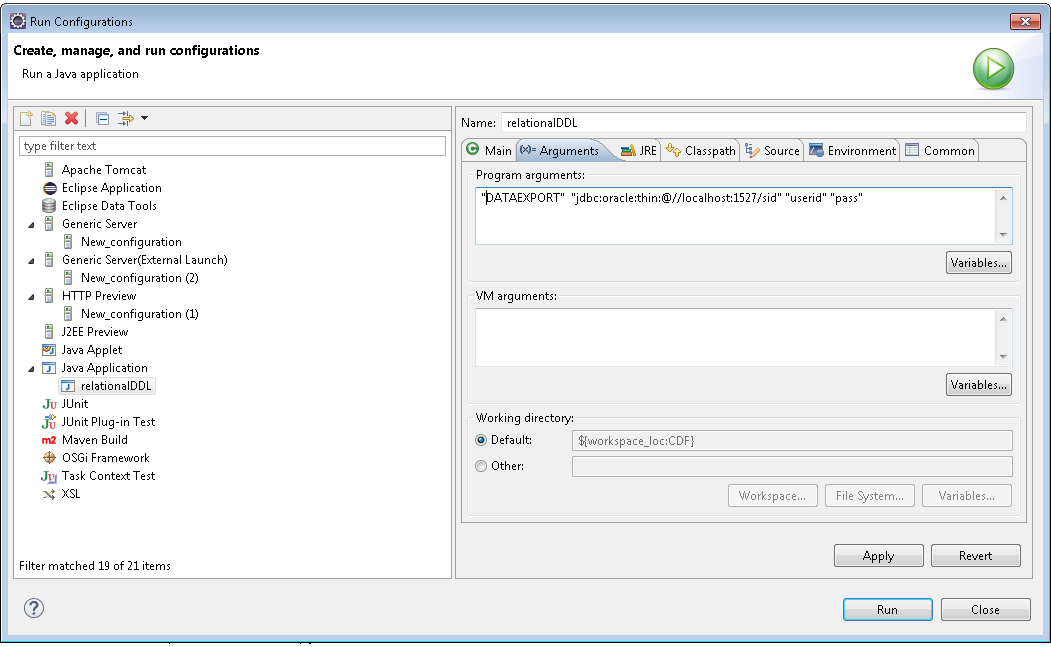
If you have everything set up properly then you should be able to save the code above without any error in eclipse. Once saved right click on relationalDDL.java in package explorer to create a run configuration. 


We will configure something like shown below but we will not run it. Just hit apply and close.


Once configuration is saved, right click on relationalDDL.java in package explorer and click Export. Select Runnable JAR file


Provide the path where you want to export in your local machine. Ignore any warning that says main class not found. I named the jar file as DDL.jar. 

copy this jar file to your EPMSystem11R1/products/Essbase/EssbaseServer/java/udf folder.

update udf.policy file in EPMSystem11R1/products/Essbase/EssbaseServer/java
add following lines.

// Grant all permissions to CDF DDL.jar 
grant codeBase "file:${essbase.java.home}/udf/DDL.jar" {
 permission java.security.AllPermission; 
};

Now as this CDF is ready to  run, invoke it from calc script with RUNJAVA command. For any error check Essbase.log.

Tuesday, March 22, 2016

ETL inside ORACLE EPM workspace

There are quite a few options available when it comes to choice of an ETL tool for Oracle Hyperion Essbase and Planning data load. In this blog, I will discuss how you can select EPM workspace for the same. This is an excellent  platform to use to launch jobs that has batch / shell scripts wrapped over MaxL or SQL.  But Wait! Why should I use workspace ? Why not just running batch scripts or shell scripts in the server? Because in workspace you will have audit trail with ability to restrict access for users. Also one can schedule job, check run history, debug logs etc.(yeah yeah...we can do that in server too...) Finally, better user experience!

To set it up in workspace, first you need to make sure MaxL, SQL , batch files are running properly in workspace server. i.e. path related to ARBORPATH, ESSBASEPATH etc set in the server and Essbase is installed.

1. Create a generic Application or job launcher by Navigate -> Administer->Report and Analysis ->Generic job Applications. Then click '+' sign to create a new job.  Lets call it Run_CMD as it will run our batch job. Product host is your workspace server. Have the command template set up like below. To read more about the command template setup click the help button in the popup window. Lastly provide the full path to your cmd.exe in windows as executable. click ok.


2. Now we need to provide the batch job information that we want to run with this generic job launcher. To make it more interesting, lets consider our batch job uses both Maxl and SQL in it. Which will be supplied to the script as an input file. To do this we can put our .sql and .mxl files in the server and use that path in the batch script. But by doing that we will not be able to check those files from workspace. To make it more debug friendly we will import these files.

Lets see the next steps....

3. Navigate ->Explore. Create a folder where you want to store these jobs. My folder structure looks like this ...I redirect all my outputs under the log folder.


4. Now you have to import your batch file. I had batch file called MyBatchFile.bat that looks like ...


Note: that I do not have any path specified for files InputSQL.sql and InputMaxL.mxl. We will import them into workspace. 

5. Select File->Import->File as Job

Check Import as Generic Job and click next


Select Run_CMD from drop down list and click next


Click 'Go'


Add InputSQL.sql and InputMaxL.mxl files from your PC and click ok.

At this point you may get an error if you don't have mime type set up for .sql and .mxl file type. To do that go to Navigate -> Administer->Report and Analysis -MIME Types. Click go at the bottom of the page and add .sql and .mxl type

Finally run the job by double clicking on it or by using Run job option. Use Logs folder as your output directory.


Wednesday, March 2, 2016

OBIEE: Generate Level 0 members dynamically for an Essbase upper level member


Occasionally you might have come across a requirement where you needed all the list of level zero members under a selected member. Specially it is helpful when you need to create a detailed transaction report for an upper level entity or cost center. For example, If you can generate level 0 members under certain roll up , you would be able to use it against your transaction table. The solution can be achieved different ways. Let us discuss few of them. 


SQL Solution: "Start With connect by" With function Connect_by_isleaf


If your hierarchical back-end data is flatten , then your task is much easier. Just join it with transaction table or fact table to get the details. But if your metadata is in a table in parent child format then you need to use Oracle  "start with connect by" to get your level 0 data. The query could look like this:

Select Member_name
  From (    Select Member_name, Connect_by_isleaf Is_leaf
              From Period_dimension
        Start With Member_name = :Member_name
        Connect By Prior Member_name = Parent)
 Where Is_leaf = 1

Clearly, for this to work you need to have your database table in sync with Essbase hierarchy. Which always may not be the case.


OBIEE Solution:


In OBIEE, one can actually connect to Essbase to get the metadata information and then pass it to relational database  with the help of OBIEE feature "is beased on another Analysis"


Here in the screenshot EntityLev0 is an analysis that uses presentation layer variable. That variable will pass our upper level member to EntityLev0 analysis and will produce all level 0 members below it. 

Now how to generate such report ? 

Solution 1: Generating Level 0 members in OBIEE dynamically with MDX and 'Evaluate' Function. 


The following will generate all the level 0 members of Entity dimension. Notice how you can manipulate Evaluate function by commenting out parameter requirement. 

Now you can easily make it parameterized by using a presentation layer variable. like 

EVALUATE('Descendants([@{PV_Entity}], Levels([Entity],0))/*%1*/' ,"Entity"."Gen1,Entity")

But there is a problem. This will give you member alias not member name in our current set up.

Unless you set your cube to display member_name like below.


Is there a way to get member name not alias when display column is set to display Alias? Most likely not with Evaluate. Mainly because member name is an intrinsic property of a member. Evaluate works with MDX functions and there is no mdx function available to get the member property. I will be happy to be proved otherwise. 

So, if you need list of level 0 member name , next one is the solution that you are looking at....

Solution 2: Dynamically get list of level 0 members for any higher level member with MEMBER_UNIQUE_NAME

 Step 1) Update RPD to get a flatten OBIEE column with essbase member name (not default alias)

I have wrote about this in my last blog. Read it here

Step 2) Create an analysis which would look like this: 


* "Period" above is the flatten member name available for all members. 
** {YearTotal} is default value. I normally put my generation 2 member as default. It helps to test the report. If you don't put a default value it fails in the result section of the analysis but works fine in dashboard. 


Clearly column 1 above will provide you level 0 members always based on what you have in your presentation variable. 

So, Finally use it in your transaction details report .....


Tuesday, March 1, 2016

OBIEE - How to get OBIEE column with Essbase member name (not default alias) for all generations?

In physical layer of OBIEE RPD, one can create column for Alias table.  It also gives you the ability to create OBIEE presentation layer column with Essbase member name. One can achieve that by choosing "Create column for Alias Table"  and then selecting "Member_Name" in the selection box.


But that will create only columns which are hierarchical in nature. Like one highlighted below...


But what about a getting a OBIEE flatten column(i.e. column representing all members for all generations) with Essbase member name ? 

When a cube is dragged in business layer and subsequently in presentation layer, it automatically creates a flatten member. like Period-Default above. This is generated in OBIEE "out of the box". But it is based on default alias name not member name. It is very useful candidate where you need to filter dynamically without knowing the generation value of a member. Here is the steps to create similar column with member_name. 

1. Right click on dimension in Physical layer and choose Properties.


2. click the + sign in the next window.


3. Give it a name. In my case I had it as my dimension name "Period". Then put the External name as "MEMBER_UNIQUE_NAME" and Column Type as Member Key. 


4. Drag entire cube from physical layer to business Layer and then to presentation layer. 
Voila ....

here is how it looks in analysis .....


It is interesting to observe the MDX generated for this ....


Message
-------------------- Sending query to database named  XXXX (id: <<109974738>>), connection pool named XXXX-ConnectionPool, logical request hash f18f770b, physical request hash f2454ebe: 
Supplemental Detail
With
  set [_Period0]  as '[Period].members'

select
  {} on columns,
  {{[_Period0]}} properties MEMBER_NAME, GEN_NUMBER, [Period].[MEMBER_UNIQUE_NAME], [Period].[Default] on rows
from [Cube.Database]


Friday, January 22, 2016

Dodeca Drill-Through with OBIEE

We have implemented Dodeca only 6-8 months back and since then we have received many positive feedback about the tool. As an Essbase shop we were using drill through for long time. We have used EIS and later switched to OBIEE drill-through last year. Our users love drill through reports between SmartView and OBIEE. I have described here setup for SmartView to OBIEE Drill-through.
  Since the popularity of Dodeca increased within our user base, I started exploring the possibility of accessing same OBIEE drill-through reports from Dodeca by passing parameters(token) to OBIEE  GoURL. But one can ask, why would you do that when Dodeca drill though to relational database is easy to build? Well, I can think of two different scenarios where it can be very useful.

Scenario 1. Multiple sources: OBIEE has powerful connectivity to different type of source and complex data modeling capability. If data comes from different sources, OBIEE drill through will be useful way to leverage  OBIEE's power to make it one big logical transaction table.

Scenario 2. Graph & Chart: OBIEE has a different range of animated charting options. One can use same concept of passing parameter with GoURL  to OBIEE complex interactive charts. 
Here is a video how Dodeca drill through to OBIEE works...


Set up:
 Set up for this is really simple and requires very basic familiarity with Dodeca. First we will set up our target drill through report. This target report will show an OBIEE parameterized dashboard report in the built-in web browser view of Dodeca.


To develop the target report go to Admin->View tab. To create a new web browse  view click New. Provide a name for the report. For "View Type" Select WebBrowser from drop down list. 

On the Browser property click on URL editor and add your OBIEE go URL. In my case I had the following. 


I have highlighted the tokens that are used in the URL. These tokens will get its value from source report. Before using the link in the URL editor try it  with actual value to check if GoURL is working as intended. 

Next step is to set up the source view from where you want to drill down from. To do that create an Excel Essbase view. Make sure you have all the tokens used in target report declared in selector. Define the drill through properties in this Excel view to activate drill-through. 


 In Data Drill through property find DataCellDoubleClickMembersFilter. It sets the range of data where drill-through is valid. click the property field to open the Member filter window. Most of the options are very intuitive. Here is what I had in the Member filter window...


In dataDrillThroughViewID select target view name from the drop down list. Set OpenViewForDrillThrough as DataCellDoubleClickPolicy.


At this point save the view by committing the change. Preview the source report and double click on a valid drill through intersection to open OBIEE report in another tab. 


Detailed steps to create Excel Essbase view are well explained in YouTube by AppliedOLAP folks.